
COMMERCIAL LIGHTING CLASS ONE: DIY AND NEW GEAR
There are many tools and gear available for a photographer. Some expensive, some esoteric, some rare, and some inexpensive, but invaluable for our use.
In commercial photography, we need to have the best equipment we can afford because it is our single tool for creating our product.
And that varies widely among the different genres of photography.
For instance, a tabletop photographer may be very comfortable with a camera, 2 or three lenses, and a well-developed lighting kit.
A lifestyle photographer may need 4 or five lenses and a simple lighting kit.
A food photographer may have a small, but quality light kit, and only one lens (most likely a 50mm or the highly prized 60mm Nikkor).
My friend, Steve, geta on fine with one zoom and a small lighting kit for his architectural business, and it is quite a thriving business too. You will meet Steve and get to learn some of his amazing skills in this class.
But for now let’s talk about the gear you will need for this class.
The point is to prepare you for doing work in your town or region, so there are a few basics you should have on hand. Get them as soon as you can afford to so that you can be comfortable with their use as you progress.
Camera. I know you have one, so we are good there. Lenses should run (in full-frame example) 35mm, 50mm, 85mm – or similar), A zoom that covers most of this range would be equivalent to a 24-70 zoom, or – my favorite – a 24-120 or similar.
If you have a very wide-angle lens (21mm, 16-35mm), or a couple of long zooms (200mm, 70-200mm zoom) and similar they will most likely not see much action in this class, although I want you to make a lot of additional photos besides the ones for this class.
Studio Tools.
Tripods are essential tools. If you already KNOW you want to work in food, tabletop, or product photography be on the lookout for a camera stand. You can find them used, but they are getting harder and harder to find. New ones are expensive, and there are few being made. Good luck.
Tripods are important because you are not moving all around your setup, you are moving the stuff in front of your camera. And if the image calls for precise placement or the composition is to be exact, you will want to keep the camera stationary as you arrange and re-arrange the composition. An even better tripod choice is the one that allows for a lateral arm to be used. Being able to get out and over your setup can come in very handy when shooting lay-flats, food, and product.
A good table. You need a good table, one that is at least a card table size. I believe that is 4’x4′ or similar. Make sure it is steady and will not rock back and forth or be easily moved by accident.
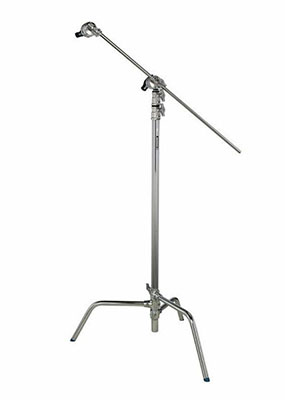 Boom. I can not even begin to tell you how important a boom is to shooting tabletop photography. I also think it is essential for portrait and fashion, but we are very focused on commercial shooting in this class. You do not need an expensive boom, you need one that is adequate for your lighting situation. I have a boom that works great for my Speedlight, but would NEVER consider putting my Profoto 600 on it. It would simply collapse. A rule of thumb is to overspend a bit on a boom. Get more than you need so you don’t have to buy another one. And my favorite boom (and stand for that matter) is the infamous C-Stand. (pictured)
A C-Stand should come with the boom bar. If it does not, look for another brand. The boom is solid, will hold any kind of light, and is very easy to set up.
However, it is heavy. Going on location with three C-Stands is, well, an adventure. I do it because I want to make sure we have no lights falling to the ground. When that happens, the ground usually wins. The shape of the legs gives it a better sandbag location with the bags pulling straight down instead of at an angle.
Other lighting stands can be what you can afford. There are some very inexpensive stand possibilities out there, and they should serve you well.
White and Silver Boards. You can fome-core boards from Target or art stores, and we use them all the time for fill and to create reflections on shiny objects. The Dollar store type boards are way cheaper, but they also handle reflectivity different being far more porous than the fome core boards. But yes, you need some of those as well. Small cards from 4×5 to 12×18 can be cut from what you have, but I try not to cut the expensive fome core board and will put shiny white card stock on the Dollar Store boards when I need something cut to configuration.
Non-Photographic Tools:
- Brushes
- Clamps (A-Clamps from Home Depot) large, medium, small
- Wire to bend
- Pliers
- Hammer
- Glue
- Sticks
- Picture Frame Stand Backs (Amazon) for holding up white cards. (Although those 70-200MM Zooms work too.)
Your kit will grow as you progress. Each new shoot will find a use for a tool that you have or will have to DIY. Whatever we do, there is the element of solving a problem that needs to be dealt with.
Lighting. Oh, lighting… There is no more difficult thing to discuss than lighting gear. And yet it is quite simple when you think about it.
You need the light that you can use to create the images you want to create.
In commercial photography, we use a lot of soft light. And we get soft light from three sources: Softboxes, white cards, and scrims.
Softboxes. Soft light with a distinct edge to the light. The configuration of the softbox makes its reflection of it have a hard edge. This can be useful when used to advantage.
Scrim. Scrims can be more subtle, more effective, and more interesting in some cases because you can move the source close to the scrim or farther back for different effects.

Lighting Instruments:
Continuous Lighting these days is usually daylight fluorescent bulbs or the more popular LED lighting kits. There are kits available on Amazon and you can find links on the GEAR page linked here.
Strobe lighting: Strobes come in a gazillion flavors, so you must think about buying into a system, rather than one-offs here and there. Strobes have the advantage of letting you use faster shutter speeds, as well as a modeling light for setting the lights where you want them. There are battery-powered strobes and those that plug into the wall. The difference in prices is significant. So my suggestion is to purchase a set of AC-powered strobes and plug them in when using them in your studio. You can buy a three-light set for less than a single 600WS battery strobe.
How many do you need? Two if you have a Speedlight or two hanging around. Three if you do not, but they can come in stages. You need ONE good main light to get going, and if you can use your Speedlights in ‘slave’ mode, you will have your additional lights there.
There are examples and kits available on Amazon and you can find links on the GEAR page linked here.
Reflectors: I believe that the best bang for the buck in photography is a shower curtain from Target, or a good 5-in-one reflector. The reflector kits give you white, black, silver, and gold reflectors as well as a scrim inside. There are so many places you can use them. When you order, get large, and get two. Matching light sources are important on occasion.
Umbrellas. You will not need an umbrella for this class. They are rarely used for tabletop and commercial product photography. I love them for portraits and environmental work, but not anywhere near reflective surfaces.
Octaboxes: These are like softboxes, but with a round configuration that I really like. A good octa, especially a deep octa, can be invaluable for great portraiture. In the studio, they can be used with super effectiveness behind a scrim. Again, I recommend a matching pair. If you can only afford one, make it a medium-sized (36-42 inches.
Below are four videos that will introduce you to lighting concepts and how a mix of DIY and professional gear can be used.
And one of the most important principles we have in lighting on the table. The “Arc of Beauty” is from side light to backlight. Front light is for people, backlight is for still life.