
Small studio shooting, what we used to call ‘tabletop’ is a favorite of mine. This is a very simple shoot with only one studio light on a boom. The subject is a decanter from the kitchen and some “ice chips” that we use for drink shots for a ‘crushed ice’ look. These are made from acrylic and really look great as ice in a glass – or uncut diamonds. I usually keep 3 or 4 million dollars worth of uncut diamonds around for shots like this, but they were unavailable because my vault guy wasn’t there.
Using a single 3’x3′ softbox on a boom, I brought the light in close to the tabletop. The table is a metal top, so it has a medium efficiency… certainly enough to get a specular source off of the area around the glass object I am shooting.
The glass is very efficient, so the specular (light source) reflects off of the various facets and shiny surfaces. The other side of that coin is that the efficient surface will also reflect the areas where there is no light. I can choose to make all kinds of reflections with cards for a single exposure, or add them one at a time and blend them with Photoshop.
The specular on the surface extended back behind the decanter, so I placed a scrim board in front of it (flag if you will) to cut the reflection of the light in that area. Keeping the back dark with the glass lit up so well adds some dimension to the image that wouldn’t exist if the background simply stayed lit all the way from front to back.
I recommend that you try to work these out with the single-image approach before going all out on the multiple shots and layers approach. I think it is very important to figure out how the speculars are created, where they go to look right, and how to achieve that liquid highlight that makes efficient surfaces LOOK efficient.
A single Norman head attached to an 800WS pack set at 200WS is our light. It is brought from behind with an angle to it to help feather the light away as it comes closer to the camera. The angle also helps present a specular source right behind the glass. (Have I ever mentioned how important booms are? I have? Good. I cannot imagine being a photographer without a boom. Make it your first – or next – purchase.)
The camera is mounted to a small camera stand and locked down for the shoot. I am shooting tethered into a MacBook and using the Canon software that comes bundled with the cameras.
You can see the setup in the video below. This is what I consider a very fast, easy setup for a tabletop. At least one that is on a surface with the camera aimed down.
Below you can see a set of images that show what happens when we are looking for exposure. Taking various readings from pointing the dome up to pointing it at the camera are taken. We begin with the dome pointing toward camera and it is too hot. Stopping down a stop makes the shot more appealing, albeit a bit darker than I want it to be.
Bringing in a fill card from the front lightens up the set as well, so I make a note to darken that within Photoshop. I call it “increasing the vignette” and in my head I saw a much smaller specular background reflection, so that would be something I may work in with a second scrim or do in Photoshop… this time Photoshop.
After getting the main exposure the way I wanted it, I made an additional 6 shots with the cards in the image to give me the specular sources on the glass. This helps to keep the glass “lively’ and not simply reflect the dark studio. Attention is paid to what the cards are doing from camera. It is best to do to this with an assistant.
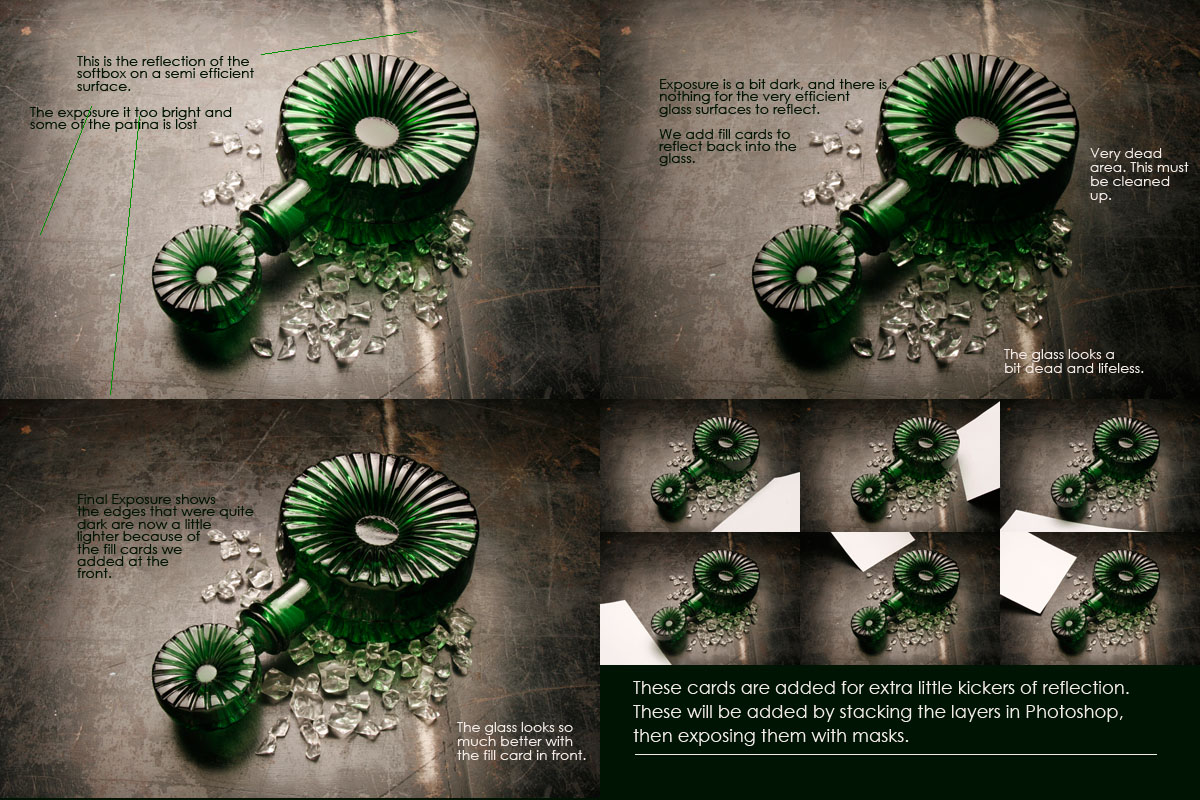
You can see above the different shots I used to make the final image.

You can see the dark sides of the glass as it simply reflects the dark studio surrounding it.
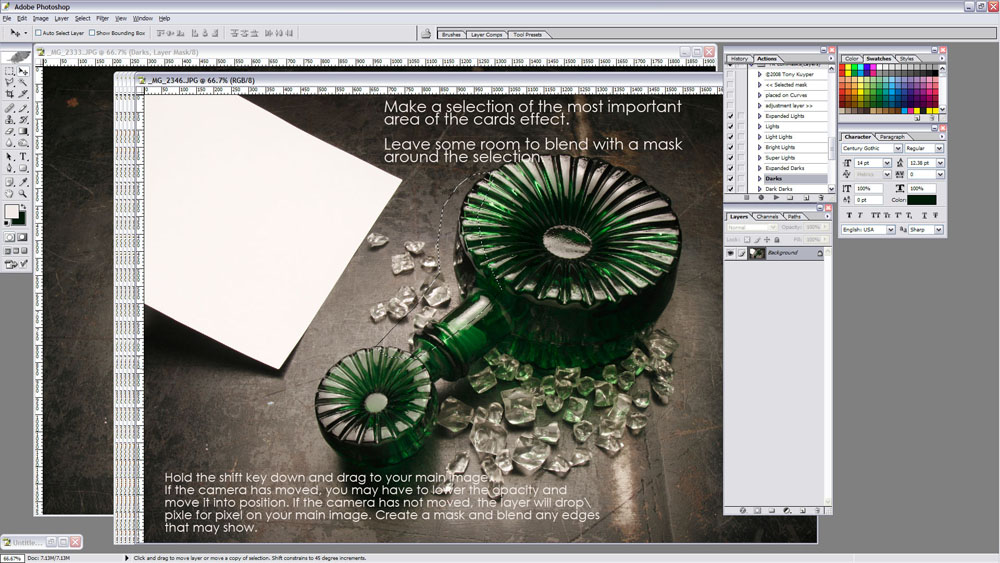
Now I look at the shots where the card was used to create highlights and carefully cut out the places I see the difference. I add some space around this so I can feather it in after moving it over.
Holding the shift-key down and putting my move tool in the area that I have chosen with the lasso tool, I hold the shift key down and slide it to the main image. It falls on a new layer, and the shift key being down makes it fall directly on the place it needs to be. If the camera has not moved, you will probably have to do nothing to the alignment… it should be perfect.
If the camera has moved, the best thing to do is increase the magnification of the new layer, change it to 60% opacity and nudge it into alignment.
Occasionally, the fill card will have lightened the background or edges slightly causing a visible line. We fix that with a layer mask.
Click on “Add Layer Mask” icon and choose black with a small, soft edge brush. I use an opacity of 35% when I am doing this. Carefully paint the edges that you can see with the soft black brush. That will reveal the layer below and you can feather them together to make the edge disappear.
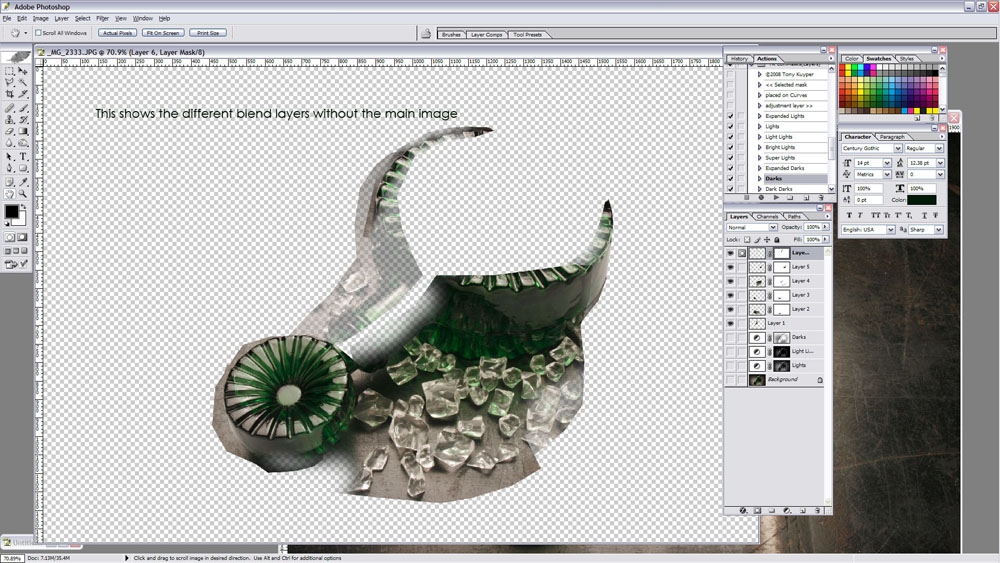
Here you can see the layers and masks used to create the final image seen below. After the layers are blended I add a blank layer and set the Blend Mode to “Overlay”. With black and white brushes and opacities of 9 I will slowly and carefully lighten the areas that need it, and darken the areas that need to be a bit darker. This method does not destroy the image nor does it change the color of the pixels… it simply darkens the luminosity of it by placing a darker or lighter mid-tone above it.
When that is done, the Tony Kuyper Luminosity Masks are applied as I see fit. I love these masks and use them on every image that passes through my little pixel factory here.
The final image after the compositing.

I hope you enjoyed this little blast from the past.